(And I get a wee something when you buy through my ad links, so, thank you so much! You're the BEST!)
How To Tile Any Room Or a Shower!
Same Techniques, and a Great Skill to Have!
#Tiling #HowToTile #Tile #Flooring #BathroomRenovation #Reno
Scroll down to the Bottom to see the Ceiling Tiles, Flexible Crown Molding, Kitchen BackSplash you can literally just roll on and glue - ah'mazing!
Great Prices on Building Supplies from Amazon
How to Tile
This is the Sunroom at the Tiling Stage...
Clean the Floor completely and Lay out the Pattern. (Guess who got the lucky job of Cleaning the Floor?? That's right --
Meee! I get all the 'Glory Jobs'! The good thing is that I know that every job is critical to the End Product, and I happen to like the 'Glory Jobs'! )
 |
| Find the exact center of the room and mark it. |
 |
Dwight* and Steve have found the Center of the Room and have drawn a full square where the First Set of Four Tiles for the In-laid pattern will go.
|

|
This first picture is just to show you the pattern you will make on the Floor or Wall by dragging your Large Knotched Trowel through the Mud, although if you are working with Wall Tile, you'll use a product called 'Mastik'.
Go to the Tile Section of the Hardware Store to get all the tools you'll need to complete the job. You should be able to Rent the Mixer there, too, or go to a Tool Rental Center.
|

 |
In the Second Picture, Steve is 'Buttering' the Tile. You put one 'mound' of mud on the back of the tile and smooth it out with a Small Toothed Trowel. I prefer the Plastic Trowels, because they don't make that horrible scraping sound, but when you're in a hurry, I'm sure you'll be happy to put up with any annoying noise to get the job done!
|
Dwight and Steve have found the Center of the Room and have drawn a full square where the First Set of Four Tiles for the In-laid pattern will go.
You put a few mounds of Mud on the Floor with the Spatula, then spread it around to create thick grooves with a Large Knotched Trowel. It is especially important to make the grooves thick when you are working with Large Tile (16" or more).
 |
Well, I don't know if you can see the little chip in this tile, so I circled it. Even though it's a tiny chip, you would want to save this for a Corner Piece, so you could still use the Tile, just for a cut piece.
Well, I don't know if you can see the little chip in this tile, so I circled it. Even though it's a tiny chip, you would want to save this for a Corner Piece, so you could still use the Tile, just for a cut piece.
|
 |
There's Aidan in the Corner Window that goes to our Master Bedroom -- the Sunroom is adjacent to the Master, a very nice feature! You can see that I removed all the Curtains -- better to be safe than sorry... it only takes a second to stand up and get Mud all over the curtains! (Look how little Aidan is in this pic - and, here, I still look the same! lol!)
There's Aidan in the Corner Window that goes to our Master Bedroom -- the Sunroom is adjacent to the Master, a very nice feature! You can see that I removed all the Curtains -- better to be safe than sorry... it only takes a second to stand up and get Mud all over the curtains! (Look how little Aidan is in this pic - and, here, I still look the same! lol!)
|
Mix the Mud to Lay the Tiles. You need to follow the directions on the Package, then sometimes add a bit more water until you have the consistency of a thick batter.
Here's Dwight cutting the Tiles on an Angle. This is Dwight's favorite Tile Cutter because it can cut up to a 24" Tile. We are very partial to the big tiles, now. The tiles for the Steam Room are 18", and the tiles in this Sunroom are 16" Laid on an Angle with the five sets of four 4" tiles to form the inlaid pattern.
Here's Dwight checking the Molding... and sanding the Cut Edge of a Corner Cut Tile.
Now Dwight is measuring for the Schluter Molding (spelling?? I have no idea how to actually spell this!) -- sometimes it is just called Tile Trim, or an assortment of other names, but you'll find it nestled in the Tile Section, too. The Hardware Stores are kind enough to organize everything you will need for the entire job in one neat little area! You can buy all this stuff on-line, too -- even the tile. In fact, some of the best deals around are on-line, not too surprisingly...
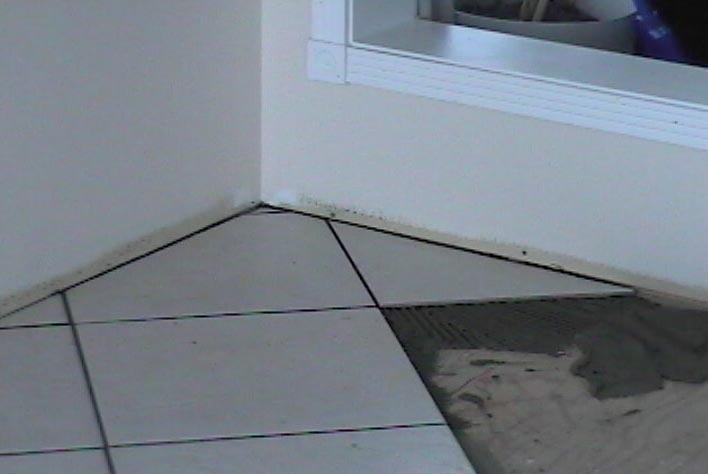
The Schluter Molding is the transition piece between the Carpet and the Tile. Measure it very carefully, then cut and file it down to a smooth edge.
All the Cut Tiles along the Molding have to be sanded, too, to make sure no-one cuts their foot on a sharp edge.
The Molding goes over the Carpet Edge and is Nailed to the Wooden Floor. Dwight likes Roofing Nails because they cover a good portion of the Molding.
To Set the Tile, you put it along the Straight Line, then gently let it drop. It'll be firmly in place, then you can adjust it to make sure it's evenly set all around.
Place the Spacers in between the Tiles so they'll stay in place. Putting them upright will give you a tighter Grout Line. See the little plastic thing on the tile?
You start in the Center of the room and make your way into the farthest corner from you -- whichever corner will allow you to continue working without being boxed in.
 |
When you've laid a tile, there will be excess mud around the edges. If you're not going to continue working in that direction, or it's break time (!), take the Spatula (can't think if that's the correct name, but that's what I call it! I think Tiling is very similar to baking!) and slide it under the mud along the edge of the tile. Have an old tile box handy to put any excess mud and other junk into.
When you've laid a tile, there will be excess mud around the edges. If you're not going to continue working in that direction, or it's break time (!), take the Spatula (can't think if that's the correct name, but that's what I call it! I think Tiling is very similar to baking!) and slide it under the mud along the edge of the tile. Have an old tile box handy to put any excess mud and other junk into.
|
And here's the Sunroom almost done -- we just need to Grout with a nice Biscuit Color and we're all done!
That's my 'Settee' where I like to Read -- what a gorgeous room this is!
How to Tile
Find the exact center of the room and mark it.
Mix the Mud to Lay the Tiles. You need to follow the directions on the Package, then sometimes add a bit more water until you have the consistency of a thick batter.
This first picture is just to show you the pattern you will make on the Floor or Wall by dragging your Large Knotched Trowel through the Mud, although if you are working with Wall Tile, you'll use a product called 'Mastik'.
Go to the Tile Section of the Hardware Store to get all the tools you'll need to complete the job. You should be able to Rent the Mixer there, too, or go to a Tool Rental Center.
Dwight and Steve have found the Center of the Room and have drawn a full square where the First Set of Four Tiles for the In-laid pattern will go.
You put a few mounds of Mud on the Floor with the Spatula, then spread it around to create thick grooves with a Large Knotched Trowel. It is especially important to make the grooves thick when you are working with Large Tile (16" or more).
In the Second Picture, Steve is 'Buttering' the Tile. You put one 'mound' of mud on the back of the tile and smooth it out with a Small Toothed Trowel. I prefer the Plastic Trowels, because they don't make that horrible scraping sound, but when you're in a hurry, I'm sure you'll be happy to put up with any annoying noise to get the job done!
To Set the Tile, you put it along the Straight Line, then gently let it drop. It'll be firmly in place, then you can adjust it to make sure it's evenly set all around.
Place the Spacers in between the Tiles so they'll stay in place. Putting them upright will give you a tighter Grout Line.
Well, I don't know if you can see the little chip in this tile, so I circled it. Even though it's a tiny chip, you would want to save this for a Corner Piece, so you could still use the Tile, just for a cut piece.
Here's Dwight cutting the Tiles on an Angle. This is Dwight's favorite Tile Cutter because it can cut up to a 24" Tile. We are very partial to the big tiles, now. The tiles for the Steam Room are 18", and the tiles in this Sunroom are 16" Laid on an Angle with the five sets of four 4" tiles to form the inlaid pattern.
There's Aidan in the Corner Window that goes to our Master Bedroom -- the Sunroom is adjacent to the Master, a very nice feature! You can see that I removed all the Curtains -- better to be safe than sorry... it only takes a second to stand up and get Mud all over the curtains!
You start in the Center of the room and make your way into the farthest corner from you -- whichever corner will allow you to continue working without being boxed in.
When you've laid a tile, there will be excess mud around the edges. If you're not going to continue working in that direction, or it's break time (!), take the Spatula (can't think if that's the correct name, but that's what I call it! I think Tiling is very similar to baking!) and slide it under the mud along the edge of the tile. Have an old tile box handy to put any excess mud and other junk into.
Now Dwight is measuring for the Schluter Molding (spelling?? I have no idea how to actually spell this!) -- sometimes it is just called Tile Trim, or an assortment of other names, but you'll find it nestled in the Tile Section, too. The Hardware Stores are kind enough to organize everything you will need for the entire job in one neat little area! You can buy all this stuff on-line, too -- even the tile. In fact, some of the best deals around are on-line, not too surprisingly...
The Schluter Molding is the transition piece between the Carpet and the Tile. Measure it very carefully, then cut and file it down to a smooth edge.
All the Cut Tiles along the Molding have to be sanded, too, to make sure no-one cuts their foot on a sharp edge.
The Molding goes over the Carpet Edge and is Nailed to the Wooden Floor. Dwight likes Roofing Nails because they cover a good portion of the Molding.
Here's Dwight checking the Molding... and sanding the Cut Edge of a Corner Cut Tile.
And here's the Sunroom almost done -- we just need to Grout with a nice Biscuit Color and we're all done!
That's my 'Settee' where I like to Read -- what a gorgeous room this is!
How to Grout the Tile
First, choose a nice color to compliment the tile.
Mix the Grout according to the Package Directions, making it the texture of paste.
There's a device called a 'Floater' that you can get in the Tile Section, too. You could use a spatula or make a little thing that looks like an Icing Dispenser you would use for cake decorating... I'll make one and take a picture of it for you when I get around to Grouting the Sunroom!
Oh, I just thought of an easy way for you to make an Icing Bag -- take a Large Freezer Bag and cut a wee bit off the bottom corner. Most Grout Lines are between 1/16th to 1/4 of an inch, so make the hole accordingly.
Clean the floor and all the lines in between the tiles. Vacuflo is a great little tool for this!
Push the Grout in between the tiles, making sure to avoid any air bubbles. (That's Dwight's job! I'm Grout 'cleaner-upper'! It's a good skill to have, because it's the difference between a okay looking job and a gorgeous job.)
Now to clean it off -- Wail 'til the Grout has hardened a bit -- about 15 minutes. Start in the area where the person applying the Grout first began. That area will be ready to 'clean' first'.
Some people use enormous sponges to clean the grout, but I find the small Scotch-Brite Heavy Duty Sponges are much easier to control, especially with fine lines.
Get a big bucket of Hot Water, (not so hot that you can't put your hands in, though!) and your sponges. Have at least 3 or 4 on hand before you get started.
Put all the Sponges in the Bucket of Hot Water. Wring out one sponge, and gently remove all the Grout from the inside of the tile. This might take a while. Frequently rinse off your sponge.
Now for the tricky part -- the actual Grout Line. Carefully run a nice clean, but wet, sponge along the Grout Line. Get your finger wet and run it along the entire line to make the grout really smooth. It'll look great!
Just work your way around the room until you're done. Change the water often and remember to dump it outside, since it's gritty and shouldn't go down the sink.
Good luck!
I've added some 'Grouting Tips' to my At Home With Ailsa Page, so come on over a check them out! (Then you can come over for a visit any time you like -- I'm doing a Daily Update, now, and it's a lot of fun!)
I really loved this picture - I found it on Pinterest, and it's a pic from flickr... but couldn't find the person who took it... but, anyway, I
looove this tile pattern - this is a fantastic idea! I've gotta head to Home Depot to see what the thinnest possible tile there is, since wouldn't this be lovely in a shower wall? I'm trying to figure out if this will work between a small tile, although I absolutely love it with the larger tiles, and am a big fan of the largest tiles you can find - they didn't come out with the 24" X 24" tiles until after we were finished tiling the Sunroom - and these pictures sure make me miss my old life! booo!! I need to build another house - a smaller version of the house on my site...
www.buildyourownouse.ca, if you haven't been in there... tons of building stuff : )
*Oh, and just in case you're 'new' to me, and my massive amount of writing (!), Dwight is now my ex-husband, but he's a really goo guy, no worries! And Steve is now in LA, lucky guy, pursuing his Comedy Career - I'd love to see Steve on SNL, he's soo crazy-funny! lol!


I like the no Pre-Payment penalties - look for that phrase any time you borrow any money - on your personal loans, car loans, mortgage loans, home repair loans - anything, since you want to pay those loans back as quickly as possible, making the largest payments you can afford... that's the key, for sures.


 Canadian Residents Click Here for Personal Loans


 The Best of Black Friday
 One Day. Online Only. Cyber Monday Deals
 Up to 40% OFF Select Major Appliances $396 or More
Plus FREE local delivery and haul away.
Offer ends 12/2/15.
Up to 40% OFF Select Major Appliances $396 or More
Plus FREE local delivery and haul away.
Offer ends 12/2/15. 25% OFF Artificial and Fresh-Cut Christmas Trees
 The Best of Black Friday
Save on Lighting
The Best of Black Friday
Save on Lighting
Oh, man,
I cannot WAIT to build another house - me so ah'cited! I just need a million dollars, or so... no, me joke! Although I
WOULD love a million dollars, or so, right?? lol!
Go ahead, and you put that out there in the Universe, too, and we'll see who gets to a million dollars, first, or if we both get there at exactly the same time - lol! : )
Wow, look what I just found - I'm soo excited about this - I've used the
Styrofoam Crown Molding, before, but I've never seen the lightweight and very attractive
Ceiling Tiles, would be perfect if you're doing a Reno on a place with a drop ceiling - you know, like the ceilings they have with the million little tiny holes you stare at when you're at the dentist - lol!
Anyway, you could use these on any build, or renovation project - the tiles are gorgeous - oh, man, would be so nice, a really great Quick-Fix, or the beginning of a lovely home... and Kitchen BackSplashes, too... soo many cool things for you to look at and dream about - I think I already have a little plan in mind! Let me know if you try them, and send me some pics, so I can post them for us all to see your handiwork! : )
Get 10% off on all orders use Coupon code "Remodel77"
Wow, how gorgeous is that, right? And they have flexible Crown Molding - and they have Inside Corners and Outside Corners for the Crown Molding - do you know how much time that will save? And it's super-lightweight, so easy to cut, very easy to install - really, is literally like a Cut and Paste Project - lol! But your house will look amazing when you're done!
Get 10% off on all orders use Coupon code "Remodel77"
Get 10% off on all orders use Coupon code "Remodel77"

 Find the right pro for your project at Home Advisor

 5.00 Carat Pink Topaz and Diamond Heart Pendant in .925 Sterling Silver - $39 + Free VDay Delivery