Showing posts with label eggs. Show all posts

Sunday, June 28, 2015

THE Easiest Scrambled Eggs, Evah'! #Eggs #ScrambledEggs #HowToMakeEggs


 THE Easiest Scrambled Eggs, Ever! Yum!

Always have a good Eggs-it strategy, right? bah'hahaha! #ExitStrategy ; )

If you are ever in the mood for some yummy Scrambled eggs, and you want something super-easy to make, try making your Scrambled Eggs in the microwave - soo easy - just one minute in the microwave per egg, soo, any amount of eggs, a little bit of milk, Voila, Scrambled Eggs! Yum! I love Scrambled Eggs with Toast and Salsa - so delicious, and super healthy, too : )


Well, this just made me laugh - the egg yolks just did this on their own - sending me a message? hahaha!


Oh, so here's something cool - I was already planning to make a delicious Cool 'n Creamy Peach Pie, today, right, and my Peach Pie has an amazing 'filling', if you will, with 2 egg yolks, brown sugar, sour cream, and vanilla... omg, is soo good, is crazy... anyway, I thought, well, I could literally just pick up two of the egg yolks, set them aside for the Peach Pie that I'm just about to make, in a few minutes... 

Just pick up the yolks with your super-clean hands, put them in their own little dish... see the cans of peaches, off to the side of the Salsa and the toaster? lol! 
Add some milk, give your eggs a good whisking... 


Cover and pop in the microwave for the same number of minutes as you have eggs in the bowl...
1 minute per egg.

 That's a pretty bathing suit! Me loves to swim! : )
Your eggs will come out of the microwave like a souffle, so, technically, you could just serve it like that, but if you still want to go with the Scrambled Eggs, just cut with two knives - super easy : )


 See how easy?  Super yummy and healthy, too : )  You're Welcome! hahaha! 

Happy Eating!  Ailsa : )


Tuesday, March 31, 2015

How to Make Peeling the Shells off of Eggs Super-Easy #Eggs #BoiledEggs #EasterEggs - How To Boil Easter Eggs : )


$25 FTD Flower, Plants, & Gifts eGift Code + $25 Restaurant.com eGift card. Save $30 with Specials by Restaurant.com  Flowers AND Dinner Out??  Yahoo!  The perfect combo! 


How to Make Peeling the Shells off of Eggs Super-Easy.....Add Baking Soda to Your Boiling Water - is sooo cool!

Add 1 heaping Tablespoon of Baking soda to your big pot of Boiling water, let it foam, then gently place the eggs in, one at a time, with a large metal spoon. ( A soup spoon, nothing fancy - lol!)

AND, give your Boiled Egg a good shake in a glass or jar of water (cover the top - lol!), the peels should come right off, and start from the bottom (now we're here - Thanks, Drake! Haha!) of the egg, where the little dint in the egg is... the egg shell will peel off - and, of course, tap the boiled egg all around, too! 

How To Tell If It's A Good Egg, or if your eggs have gone bad - When you place the eggs, one by one, on a big spoon, into the boiling water, if the egg floats to the top - Bad Egg - if it just stays in the bottom, that's a Good Egg! 

             (Take a little Fun Break with Ailsa! : )

Why not try a little something to make it sooo much easier to peel your boiled eggs?  and it is super-exciting when you first add the baking soda - it'll foam right up, momentarily, then literally, simmer down (do you hate that phrase from all the teachers having said that in your classes, all your life?? lol!) to a normal boil.....

Then, carefully set each egg in the boiling water, with a large spoon...


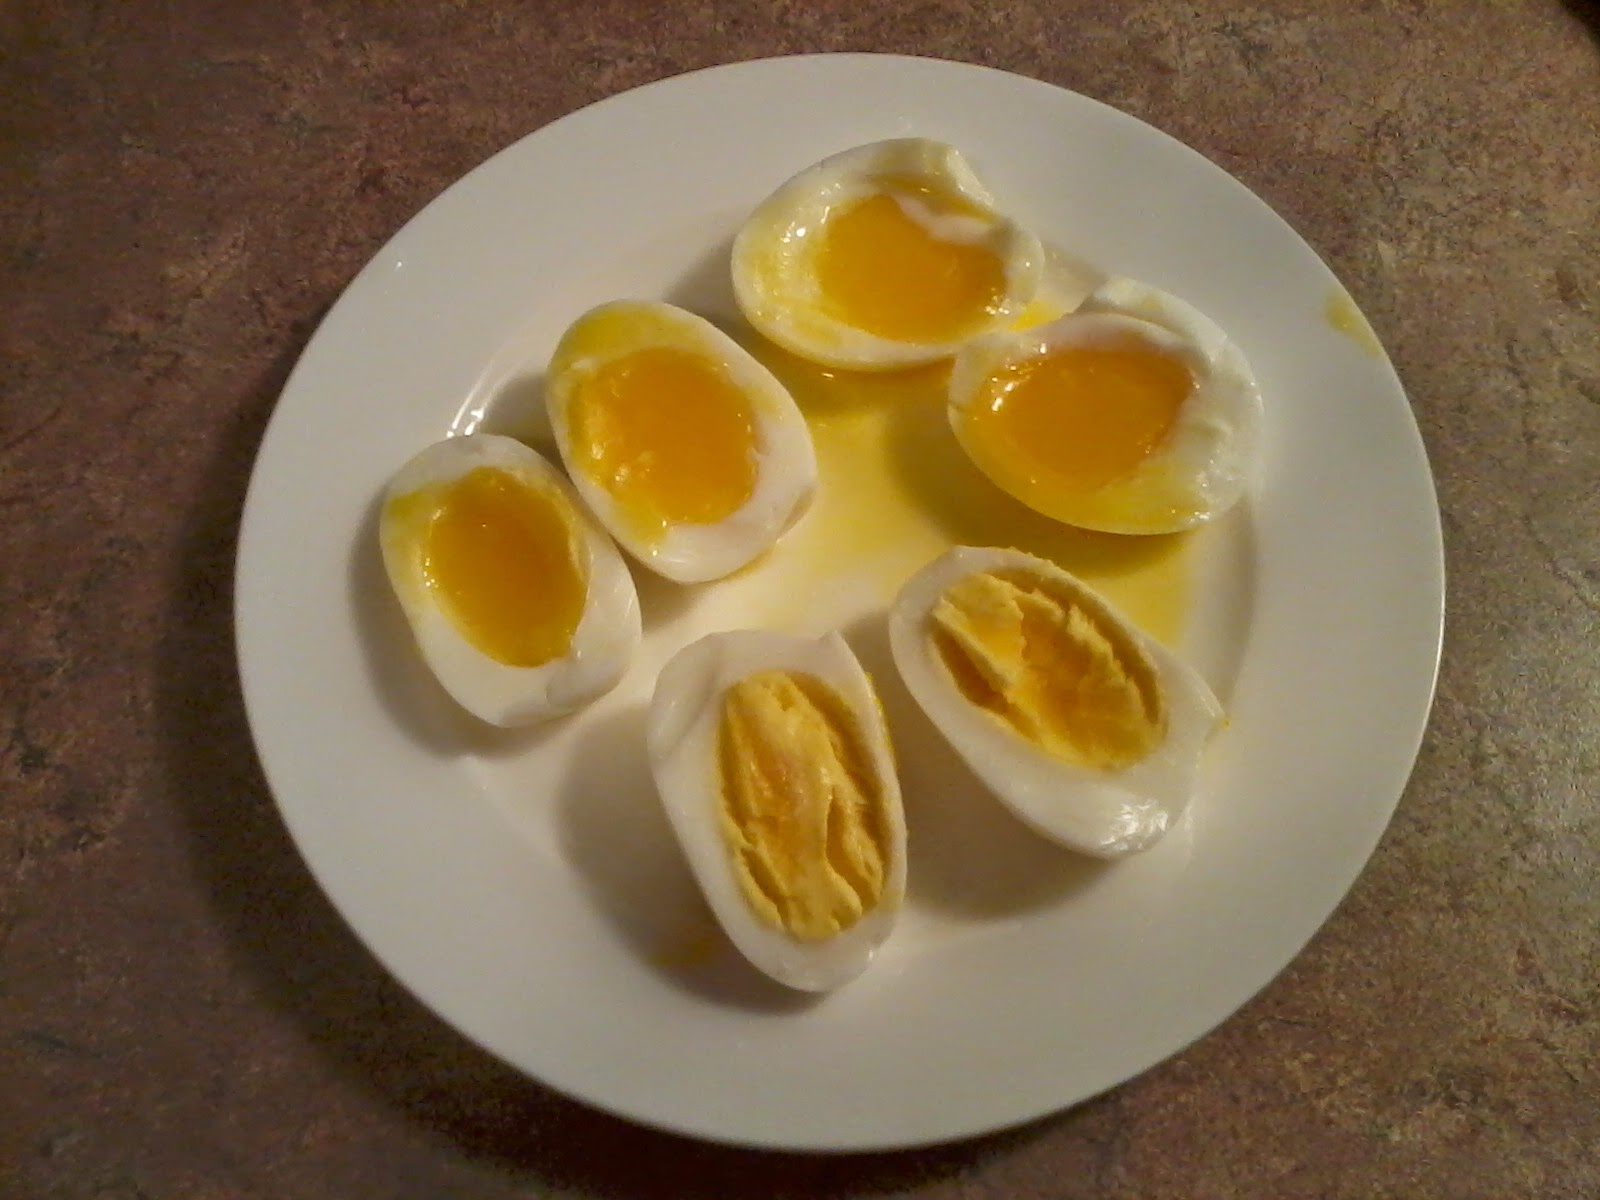
I thought it might be helpful to see the Boiled Eggs at various stages... we're at Sea Level (we are, for sure, right by the Sea, on the ocean, and, well, errrr, aaahhh, at Sea Level, but we used to live in Calgary, so the timing is different at different elevations - so is a good idea to take your eggs out earlier, if your eggs cook faster at a different elevation... same thing goes for baking, and whatnot... lol!)

Anyhoooo, the Boiled Eggs at the top are 7 minute Eggs, then 8 minutes Eggs, then the 10 minute Eggs.  So, really, it's however you happen to love your eggs, or whenever you remember you were making some boiled eggs! lol!

Yumm, this makes me hungry!  And Eggs are soo good for you... I know there's a whole debate about whether it's okay to eat the yolks, and it's totally okay, very good for you. And, tastier, for sures. 

Adding Baking Soda to the boiling water for your Boiled Eggs, though, is great for Easter, when you might be rolling your Easter Eggs with the family.. sometimes it's soo hard to get the egg shell to break, and it can be frustrating for little ones (and the big ones, too - hahaha! - Not sure how many times we've ended up throwing our Easter Eggs up against a tree, try to get the shell to break - naturally - lol!

Switch to AT&T and get the new Galaxy S6 plus a $100 Bill Credit when you add a new line of service on AT&T Next.


And here's how we like to have our little boiled egg sandwiches - yum!  I like a slice of Havarti on the sandwich, sometimes, too - all very healthy... and sometimes we just like to have the boiled eggs on their own, and I add a wee bit of butter and salt - yum!  A nice little treat : )


How to Make Peeling the Shells off of Eggs Super-Easy.....Add Baking Soda to Your Boiling Water - is sooo cool!

Add 1 heaping Tablespoon of Baking soda to your big pot of Boiling water, let it foam, then gently place the eggs in, one at a time, with a large metal spoon. ( A soup spoon, nothing fancy - lol!)


Rolling your Eggs at Easter : )
 http://buildyourownhousebodylife.blogspot.ca/2011/04/easter-traditions-roll-your-eggs-at.html

Easter - we looove Easter - so lovely!
Easter Sunrise Services can be so lovely : )
http://buildyourownhousebodylife.blogspot.ca/2012/04/happy-easter-we-went-to-easter-sunrise.html

We love to Roll Our Eggs on Easter - a fun tradition for the whole family : )
http://buildyourownhousebodylife.blogspot.ca/2011/04/easter-traditions-roll-your-eggs-at.html

If you want your beautifully decorated Eggs to last forever, just learn to blow them... you need to make a little hole at the top and the bottom, poke a toothpick through the yolk, and you're well on your way... rinse and decorate : )
http://buildyourownhousebodylife.blogspot.ca/2012/03/blown-and-painted-easter-eggs-theyll.html

Make cute little Marshmallow Bunnies with the kids : )
http://buildyourownhousebodylife.blogspot.ca/2011/04/easter-crafts-marshmallow-bunnies.html


  My favourite books to start with, with Louise Hay - You Can Heal Your Life - brilliant, and it really WILL change your life... and Meditations for Daily Living - think that's the right title  - is so lovely, you'll love it - all very heartwarming, very clarifying... and Louise Hay has a tiny little book, I Can Do It - looove it, you'll love it, too... I love all of Louise's books... so lovely and life-changing : ) http://buildyourownhousebodylife.blogspot.ca/2014/11/you-can-heal-your-life-by-louise-l-hay.html


Thursday, March 29, 2012

Blown and Painted Easter Eggs - They'll Last Forever! #EasterEggs #Easter!


Is this a Giant Strawberry??  Nooo, it's a blown Easter Egg, cleverly disguised as a strawberry! lol!


These little Blown Easter Eggs are so easy to make, and a lot of fun no matter what age you are, but will be tricky for the younger set to do without a fair bit of help.  Blowing out the eggs is really an adult job (insert jokes here for your own amusement! lol!).  The key is to use a really long nail (from the hardware store) or a turkey skewer thing... looks like a long nail, but is maybe used for holding the turkey legs together??  Lol!  Canny remember what that thing is for, I only use it for blowing eggs! hahaha!  (I'm making myself laugh, now! 'Course, you know what they say about me, I'm an easy laugh... man, I hope that's what they're saying, but you can never trust 'they'... hahahahaha!) 


So you can start with a dozen eggs, if you like, get a bowl, and whatever you've decided to use to make a hole in the top and the bottom of the egg.  It will need to be long enough to go right through the egg to comletely pierce the yolk, since that will never go through the hole intact.... silly!  The easiest way to make the whole in the egg at the top, is to wiggle the nail at the top a bit -- don't try to force it, will most likely result in a big mess, and who wants that? Nope, just take your time, it'll be easier than you might think.  Make sure the bottom hole is bigger than the top hole, but not too much bigger... maybe an 1/8", but don't despair if it's closer to 1/4"... the bottom of the egg won't be seen as much, and you could always cover it with a gem, or something, right? : )


Now, this is the fun part... Gently cover the top hole with your mouth.  Gently blow the egg out the bottom. Will seem slow at first, then whoosh, out it comes.  Directly in the bowl, if you're lucky.  haha!  Of course it'll go in the bowl, provided you remembered to put one there! lol!  


Hold the blown egg over a steady stream of water in the sink, and rinse the egg out.  Might want to use the bottom of the egg with the bigger hole for this rinsing stage.  Let some water go in the egg, cover both ends of the egg and shake it about, rinse it through, again.  The goal is for your egg to have NO smell, not even after sitting around for a number of days, weeks, months, years... you get the idea! 


Set each egg back in the egg carton, tilted to the side of each segment, so the egg can drain and dry completely.  


Once your eggs are completely empty and dry, you're ready to paint.  They will be virtually indestructible, so don't worry about them crushing in your hands when you're painting or decorating them... you should be fine, but a little care goes a long way, as with everything : )


I have decorated the blown eggs in sooo many different ways over the years.  Before my lovely children were born, I must have had a massive amount of free time (oh, and that was pre-internet, so maybe that's why I had so much free time! hahaha!), but I would go out and find all these gorgeous embroidery threads with a glittery streak in them, and carefully tuck the end of the embroidery thread in the bottom hole of the egg, then wind the embroidery thread around and around the egg, no spaces, until the whole egg was covered in the thread.  They were gorgeous.  I would make up baskets of these lovely Embroidery Easter Eggs for all the people I really liked (if I like you, you will know it by the amount of stuff I make for you! lol! Baking, crafts, babies... no, wait, that last one is not the same thing... hahahaha!)


Painting the Blown Easter Eggs is by far the easiest, and a lot of fun for the kids -- a great gift for parents, if you're still allowed to acknowledge Easter in your school, and you're still allowed to teach Art in your class (this part is for the teachers! lol!)... but you can decorate them with glitter, just rub the egg with glue, carefully sprinkle with glitter... that tiny, tiny glitter is pricey, but, man, is it gorgeous, and the kids will go crazy, they'll look so lovely.  A great gift for Mom.  Oh, hey, you could make these for Mother's Day -- there, pretty sure they can't stop Mother's Day! haha! 


You can paint anything on your eggs... the strawberry was particularly easy, since it's all red, green for the leaves, little black dots for the seeds, and voila, a giant strawberry!  I have standard painting for eggs, ones that I do on every single Easter Egg I've ever painted (um, well, errr, that's a lot of Easter Eggs, over the years!)  I'll link you to y other Easter Egg page, in case you'd like to try Rolling Your Eggs at Easter... signifies the rolling of the stone from Jesus' Tomb (this is my favorite Scottish Easter Tradition!)... plus, is a lot of fun! 


Okay, have fun with your Easter Egg Decorating!  Be creative, you'll love it! 


Oh, and if you want to hang your Easter Eggs, say from a tree, the window, your Flower Tree (should that catch on! lol!), just use some yarn or embroidery thread, make a small knot at the bottom (small enough to go through the bottom hole in your egg, but big enough not to come straight through the top hole in your egg...!)... use an embroidery needle for this step... then either make a loop and go back through the top hole and tie off at the end, or make a loop and tie it at the top (much easier!).  There you go, Easter Eggs that will last for years! 


A closer look at the Easter Egg, blown by piercing each end of the egg, the bottom a little bigger than the top, pierce all the way through the egg so the yolk breaks (and your jaw doesn't! lol!), all decorated up! 
Marshmallow Bunnies for Easter
Oooh, this is my standard picture I paint on my boiled eggs every Easter!  The other side is a mountain scene with evergreens, a mountain lake and 2 deer at the side of the lake and a sunset over the mountains -- have no idea why those are my two 'go-to' pictures! 

Oh, maybe a bit silly, or, as I prefer it, sweeeet,  but this is my Christmas Tree turned into a Flower Tree, and there's my wee Strawberry Easter Egg hanging in the middle! Cute, right? Those are just flowers I've collected, many of them clips for my jackets, sometimes I pin the flowers to my purse, and mostly I use the flowers to hold the top of my dresses closed so I show less cleavage... man, the amount of cleavage that is normal in Los Angeles, and the tiny amount of cleavage that seems to be okay in Canada... especially in this little conservative area... hmmmm, perhaps this area is not for me, 'cause I gots'ta be free to be me, if you knows what I mean! lol! 


Decorate your Hard Boiled Easter Eggs for Easter... Rolling your Easter Eggs down a hill : ) (Scottish Easter Tradition, and a lovely Family experience!

Happy Easter!! Ailsa xox
Get $10 off any order of Thinner-U, start losing pounds and save $10 when you enter GETSLIM in the coupon code. $25 Off with $250 Purchase, Coupon Code: AFOCTWS25 valid from 10/15/2012 to 10/22/2012, First Come Fist Served from Alibaba.com, a great place to find all your craft needs! : )  Well, you know I was a Cat Woman - that's my kind'a costume - lol!